If your solar energy system includes a battery, a charge controller is an essential component you shouldn’t overlook. It plays a crucial role in protecting your battery, extending its lifespan, and ensuring your system operates safely and efficiently. In this guide, we’ll walk you through the process of connecting solar panels to a charge controller, breaking it down into three simple steps.
Why a charge controller is essential
A charge controller is a device that manages the flow of electricity from your solar panels to your battery. Without it, your battery could suffer from overcharging or deep discharging, both of which can significantly reduce its lifespan. Here’s a closer look at what a charge controller does:
- Regulates current flow – Think of a charge controller as a traffic cop for electricity. It ensures that the current entering your battery is safe and blocks any reverse current that might flow from the battery back into the solar panels, which can happen at night.
- Prevents overcharging – When a battery receives too much charge, it can overheat, become damaged, or even catch fire. A charge controller prevents excessive charging and keeps your system safe.
- Prevents deep discharge – If a battery is drained too much, its capacity and efficiency can suffer. The charge controller disconnects the battery from the system before it reaches dangerously low levels and reconnects it once charging resumes.
Choosing the right charge controller
There are two main types of charge controllers:
- PWM (pulse-width modulation) controllers – These are cost-effective and simple devices that reduce the voltage of solar panels to match the battery’s level. They work best for small systems but are less efficient than MPPT controllers.
- MPPT (maximum power point tracking) controllers – These are more advanced and efficient. They convert extra voltage from the solar panels into additional current for the battery, minimizing energy loss. MPPT controllers are ideal for large or complex solar systems.
The size of a charge controller is measured in amps. To determine the correct size, divide the total power of your solar panels by your battery’s voltage. For example, if you have two 300-watt solar panels connected to a 12-volt battery, you need a charge controller rated for more than 50 amps. Additionally, always check the maximum input voltage of the controller to ensure compatibility.
Gathering your materials
Before you start the installation, make sure you have all the necessary components and tools:
- Solar panels
- Charge controller
- Battery
- Wires and connectors
- Combiner box or branch MC4 connectors (optional)
- Tools: screwdriver and wire strippers
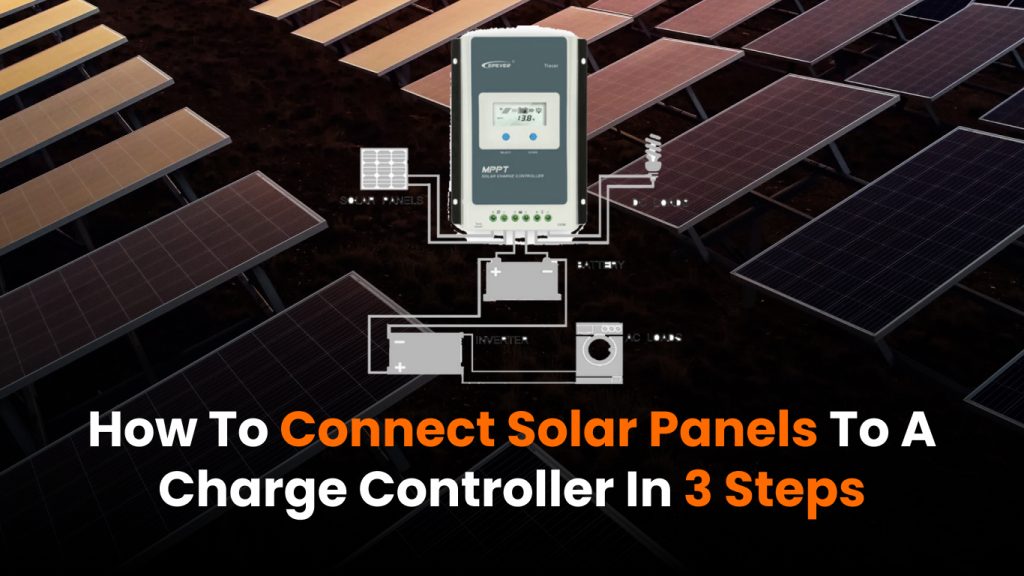
Step 1: Connect the charge controller to the battery
Most charge controllers have two main wiring sections—one for the solar panels and another for the battery. Some also have a section for DC loads, which allows you to connect devices like LED lights directly to the controller.
To connect the charge controller to the battery:
- Identify the positive and negative terminals on both the charge controller and the battery.
- Use a stranded copper wire capable of handling the maximum current in your system.
- Connect the positive terminal of the charge controller to the positive terminal of the battery using a red wire.
- Connect the negative terminal of the charge controller to the negative terminal of the battery using a black wire.
- If the wires aren’t color-coded, mark them with tape to avoid confusion.
- Secure the connections using appropriate connectors, such as ring terminals or lug connectors.
Step 2: Power on the charge controller
After connecting the battery, check all connections to ensure they are secure. Turn on the charge controller and allow it to initialize. Most controllers have a display that shows battery status and charge levels. If your controller is programmable, set up the charging preferences according to your battery type and needs. Once this step is complete, you’re ready to connect the solar panels.
Step 3: Connect the charge controller to the solar panels
Each solar panel has a junction box with two output cables:
- The positive cable has a male MC4 connector.
- The negative cable has a female MC4 connector.
Depending on your setup, you have two ways to connect the panels to the charge controller:
- Direct connection – If your charge controller supports MC4 connectors, simply plug the cables from the solar panel directly into the controller.
- Using adapter cables – If your charge controller requires different connectors, use additional cables with MC4 connectors on one end and the appropriate connectors on the other.
If you are working with multiple solar panels, the connection method depends on whether you’re wiring them in series or parallel:
- Series connection – Connect the positive cable of one panel to the negative cable of the next. This increases the voltage while keeping the current the same. Then, connect the remaining positive and negative cables to the charge controller.
- Parallel connection – Connect all the positive cables together and all the negative cables together using a combiner box or branch MC4 connectors. This setup keeps the voltage the same while increasing the current. The combined cables then connect to the charge controller.
Once everything is connected, the charge controller will begin regulating the energy flow from your solar panels to the battery, ensuring safe and efficient charging.
Final thoughts
Adding a charge controller to your solar system is a crucial step in maintaining the health and efficiency of your battery. Whether you opt for a basic PWM controller or a more advanced MPPT model, following these steps will help you successfully connect your solar panels and ensure a smooth, safe energy flow. By taking the time to set up your charge controller properly, you’ll maximize your solar energy system’s lifespan and get the most out of your investment.
With these simple steps, you’re well on your way to harnessing the sun’s energy safely and effectively. Happy solar powering!